Ever wondered how your beer gets from barrel to glass? Read on…..
 A keg is more than just a container to hold beer; it is an essential part of the dispensing system. Whatever the brand or product, basic principles are the same.
Each barrel contains a valve mechanism that firstly seals the contents from the outside environment; secondly allows a compressed gas (usually co2) in to push the contents out, and thirdly provides an exit route for the contents to flow with the help of the keg coupler.
The valve serves as an inlet for pressurized gas and an outlet for the beer.
Keg valves (or spears) consist of a spring-loaded mechanism connected to a tube that extends to the bottom of the keg. When the spring gets compressed by activating the coupler, compressed gas is forced into the barrel. This gas escapes into the headspace (above the beer) via an exit on the underside of the valve.
The gas pressure pushes down on the beer forcing it up through a tube that extends from the valve down to the bottom of the keg. From the valve, the beer enters the beer line through the coupler.
 What gasses are used to dispense the liquid?
Depending on the contents of the keg, there are a few options.
Currently the most common is a co2 / nitrogen mix. There are two main co2 / nitrogen mixes available; 60/40 (co2 60%, Nitrogen 40%) which is usually used for lagers and ciders, and 30/70 (co2 30%, Nitrogen 70%) which are more suited for Guinness and creamy bitters such as John Smiths Smooth.
There is also a 50/50 mix and pure co2. Without getting into too many details about temperatures, lengths of dispense lines and equillibrium pressures, generally, the mixed gas is the most common!
In addition to compressed gas canisters, there is also an option of using compressed air. Air is the least desirable option as once the contents of a keg are exposed to air; the quality will reduce too quickly, sometimes a matter of a few hours. You’ll read more about this further down.
 The keg coupler attaches to the keg valve and goes into the gas line as well, forcing pressurised gas into the keg that ends up pushing the fresh beer out.
There are many different fitments of couplers available with different brewers using their own preferred type, but they all work on the same principle. The coupler will usually screw onto the keg with a 1/4 turn to locate it before the handle of the coupler is locked down. Once the handle is locked, the coupler allows gas to enter the keg, and beer to flow from it.
Due to the pressures involved within the keg, rubber seals and one way valves are fitted to the coupler to ensure a perfectly gas and liquid tight seal.
From keg to glass
Now you know how a keg works, and how the liquid is pushed out of the keg through the coupler. So, now to get it into your glass! There are a few ways of doing this, although some are not as desirable as others.
 The hand pump
You’ve probably seen this option in many American movies! Someone rolls up to the party with a keg of beer and in the next shot the guests are filling their glasses from a hose attached to the keg.
The hand pump is the simplest way to dispense beer, but equally probably the worst way for several reasons.
- Beer doesn’t like to be served warm. Unless the keg has been kept in the fridge or kept in a bucket of ice, then it is going to taste pretty rough and pour more foam than actual liquid.
- Beer doesn’t mix well with air. Instead of compressed co2, the air is pumped into the keg manually with a hand pump. Within hours the beer is going to be flat, and the taste with deteriorate drastically.
On the plus side to this option, if there can be one, the keg can be set up in virtually any location as no electricity is needed!
 The ‘all in one’ beer dispense unit
About the size of a small microwave, these little dry coolers have started to come onto the market relatively recently, and in the right setting, they are pretty good! Most conventional beer coolers use a bath of water and ice to chill the beer. These units use some other magic that doesn’t require water (sorry, I haven’t delved into the technical side of these yet!). The units come with a built-in air compressor to push the beer from the keg. As with the hand pump above, we know that beer doesn’t like compressed air so the product inside the barrel will start to deteriorate after a few hours. It is possible to hook these systems up to use mixed gas / co2 though. The best thing about these coolers is they will be ready to serve cold beer within 10 minutes of plugging them in. There are a few downsides, though. The dispense of the beer is much slower than a conventional system, the beer will not be as cold, and there is a limit as to how many ‘cold’ pints the system can pour per hour. For a party of around 20 guests who will drink a keg of beer over a few hours though, this is a very good option.
The conventional ‘keg, gas and cooler’ setup (the way we do it!)
This is the setup you’ll find in virtually every pub and bar cellar throughout the UK. Tried and tested over many years and not changed dramatically. There will be a few technical variations along the way, but the general route from keg to tap will be the same.
Gas > Coupler > Keg > Beer line > Cooler > Python > Tap
Each part of this system has its role to play in serving a decent pint, but it is probably from the cooler onwards that is the crucial bit.
The cooler
Wet beer coolers come in different sizes for different applications. There is not really a ‘one cooler fits all’ setup. But there are two main types; the flash cooler and the remote cooler.
The basic principle of a wet cooler is the same. The cooler has a water tank with copper cooling coils that freeze ‘most’ of the water in the tank. This is called an ice bank or an ice bath. Think of a square box filled with water. On the inside of the box, the walls freeze to make a solid slab of ice. In the middle of the box, there is still water, but it is ice cold.
Submerged in the water are the product coils. These are a stainless-steel tube, around 10mm in diameter and anywhere from 3 metres to 10 metres long. These coils are what carry the beer through the cooler for it to be chilled. Depending on the type or size, a cooler can have anything from one to ten coils fitted.
Because of the way the cooler works, it will chill ‘by’ a certain amount, rather than ‘to’ a specific temperature. The longer the beer stays in the product coils, submerged in the ice bath, the colder it will get.
 A higher number of products, lots of pints poured, and the temperature of the beer in the keg all affect how efficiently the cooler works. If you think about a bar set up outside in the summer, where barrels are stored at ambient temperature, warm beer will be entering the product coils and ‘warming up’ the ice bank.
The most common cooler you’ll find on the hire market is the shelf or flash cooler. These are ideal for low consumption setups where maybe one or two kegs will be served over the course of the day. They designed to be used as an intermediate cooler for long runs of beer lines, and you’d usually see them under the bar at your local pub. The beer would go through the main remote cooler first, and then back through a flash cooler just before the tap.
They are relatively small and are often manufactured with between one and four product coils. Because of their size, the ice bank is quite small on them. This can cause issues in hot ambient temperatures or high throughput setups.
If you only have one product going through a flash cooler which has two product coils, it is quite common to ‘double-dip’ the product. This means the beer will travel in through one coil, out of that coil and into the next coil, and then off to the tap which will double the time the beer takes to travel through the cooler making it colder.
 A remote cooler works on the same principle as a flash cooler but is much larger. You’ll find these in virtually every pub cellar you look in. Designed for high beer throughput with a more oversized ice bath, and changeable product coils for different lengths, the remote is perfect for beers (such as kegged ales) that you don’t want to be served too cold; put in a short 3.8m coil, and your beer will be cool but not too cold.
Generally, we use remote coolers for all our setups as they will cope with most environments.
You’ll also find a water recirculation line on remote coolers (and some of the newer flash coolers) which you’ll learn a bit more about in the next paragraph on pythons!
 The Python
So, your beer has been pushed out of the keg by the gas, through the coupler into the beer line, and through the cooler. Next up is the python.
The python takes your nicely chilled beer from the cooler to the tap. It is constructed of anywhere between 2 to 14 different beer product lines. The lines are bundled together along with a water recirculation line and insulated in foam and plastic. In the pic shown, there are six product lines which are colour coded, and flow and return pipes (black) for the water recirculation.
Remember the recirculation line from the previous section? That allows the cooler to circulate ice-cold water through the python, and in some cases up to the tap, to make sure the beer doesn’t warm up once it has left the cooler.
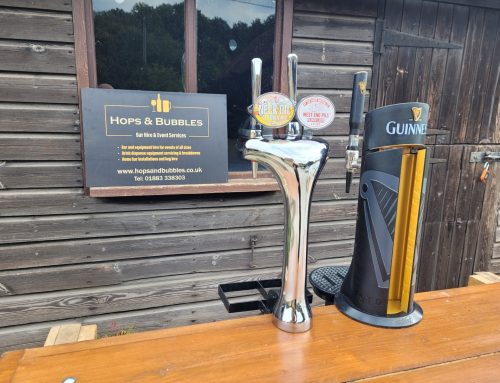
 The Tap

The tap is the last thing your beer goes through before hitting your glass. It is a relatively simple on/off switch. Some come with a flow control so you can control how much beer comes out, some don’t. Some are fitted with a fancy nozzle with filters in, and some aren’t.
The end!
That is the basics of how your beer gets from keg to glass. There are LOTS of other components that are sometimes fitted to improve the dispense of the beer, to reduce waste, or even to make the publican’s job simpler, but the basic principle is the same.
A keg is more than just a container to hold beer; it is an essential part of the dispensing system. Whatever the brand or product, basic principles are the same.
Each barrel contains a valve mechanism that firstly seals the contents from the outside environment; secondly allows a compressed gas (usually co2) in to push the contents out, and thirdly provides an exit route for the contents to flow with the help of the keg coupler.
The valve serves as an inlet for pressurized gas and an outlet for the beer.
Keg valves (or spears) consist of a spring-loaded mechanism connected to a tube that extends to the bottom of the keg. When the spring gets compressed by activating the coupler, compressed gas is forced into the barrel. This gas escapes into the headspace (above the beer) via an exit on the underside of the valve.
The gas pressure pushes down on the beer forcing it up through a tube that extends from the valve down to the bottom of the keg. From the valve, the beer enters the beer line through the coupler.
What gasses are used to dispense the liquid?
Depending on the contents of the keg, there are a few options.
Currently the most common is a co2 / nitrogen mix. There are two main co2 / nitrogen mixes available; 60/40 (co2 60%, Nitrogen 40%) which is usually used for lagers and ciders, and 30/70 (co2 30%, Nitrogen 70%) which are more suited for Guinness and creamy bitters such as John Smiths Smooth.
There is also a 50/50 mix and pure co2. Without getting into too many details about temperatures, lengths of dispense lines and working pressures, generally, the mixed gas is the most common!
In addition to compressed gas canisters, there is also an option of using compressed air. Air is the least desirable option as once the contents of a keg are exposed to air; the quality will reduce too quickly, sometimes a matter of a few hours. You’ll read more about this further down.

The keg coupler attaches to the keg valve and goes into the gas line as well, forcing pressurised gas into the keg that ends up pushing the fresh beer out.
There are many different fitments of couplers available with different brewers using their own preferred type, but they all work on the same principle. The coupler will usually screw onto the keg with a 1/4 turn to locate it before the handle of the coupler is locked down. Once the handle is locked, the coupler allows gas to enter the keg, and beer to flow from it.
Due to the pressures involved within the keg, rubber seals and one way valves are fitted to the coupler to ensure a perfectly gas and liquid tight seal.
From keg to glass
Now you know how a keg works, and how the liquid is pushed out of the keg through the coupler. So, now to get it into your glass! There are a few ways of doing this, although some are not as successful as others.
The hand pump
You’ve probably seen this option in many American movies! Someone rolls up to the party with a keg of beer and in the next shot the guests are filling their glasses from a hose attached to the keg.
The hand pump is the simplest way to dispense beer, but equally probably the worst way for several reasons.
- Beer doesn’t like to be served warm. Unless the keg has been kept in the fridge or kept in a bucket of ice, then it is going to taste pretty rough and pour more foam than actual liquid.
- Beer doesn’t mix well with air. Instead of compressed co2, the air is pumped into the keg manually with a hand pump. Within hours the beer is going to be flat, and the taste with deteriorate drastically.
On the plus side to this option, if there can be one, the keg can be set up in virtually any location as no electricity is needed!

The ‘all in one’ beer dispense unit
About the size of a small microwave, these little dry coolers have started to come onto the market relatively recently, and in the right setting, they are pretty good! Most conventional beer coolers use a bath of water and ice to chill the beer. These units use some other magic that doesn’t require water (sorry, I haven’t delved into the technical side of these yet!). The units come with a built-in air compressor to push the beer from the keg. As with the hand pump above, we know that beer doesn’t like compressed air so the product inside the barrel will start to deteriorate after a few hours. It is possible to hook these systems up to use mixed gas / co2 though. The best thing about these coolers is they will be ready to serve cold beer within 10 minutes of plugging them in. There are a few downsides, though. The dispense of the beer is much slower than a conventional system, the beer will not be as cold, and there is a limit as to how many ‘cold’ pints the system can pour per hour. For a party of around 20 guests who will drink a keg of beer over a few hours though, this would be an acceptable option.

The conventional ‘keg, gas and cooler’ setup (the way we do it!)
This is the setup you’ll find in virtually every pub and bar cellar throughout the world. Tried and tested over many years and not changed dramatically. There will be a few technical variations along the way, but the general route from keg to tap will be the same.
Gas > Coupler > Keg > Beer line > Cooler > Python > Tap
Each part of this system has its role to play in serving a decent pint, but it is probably from the cooler onwards that is the crucial bit.
The cooler
Wet beer coolers come in different sizes for different applications. There is not really a ‘one cooler fits all’ setup. But there are two main types; the flash cooler and the remote cooler.
The basic principle of a wet cooler is the same. The cooler has a water tank with copper cooling coils that freeze ‘most’ of the water in the tank. This is called an ice bank or an ice bath. Think of a square box filled with water. On the inside of the box, the walls freeze to make a solid slab of ice. In the middle of the box, there is still water, but it is ice cold.
Submerged in the water are the product coils. These are a stainless-steel tube, around 10mm in diameter and anywhere from 3 metres to 10 metres long. These coils are what carry the beer through the cooler for it to be chilled. Depending on the type or size, a cooler can have anything from one to ten coils fitted.
Because of the way the cooler works, it will chill ‘by’ a certain amount, rather than ‘to’ a specific temperature. The longer the beer stays in the product coils, submerged in the ice bath, the colder it will get.
A higher number of products, lots of pints poured, and the temperature of the beer in the keg all affect how efficiently the cooler works. If you think about a bar set up outside in the summer, where barrels are stored at ambient temperature, warm beer will be entering the product coils and ‘warming up’ the ice bank.
The most common cooler you’ll find on the hire market is the shelf or flash cooler. These are ideal for low consumption setups where maybe one or two kegs will be served over the course of the day. They designed to be used as an intermediate cooler for long runs of beer lines, and you’d usually see them under the bar at your local pub. The beer would go through the main remote cooler first, and then back through a flash cooler just before the tap.
They are relatively small and are often manufactured with between one and three product coils. Because of their size, the ice bank is quite small on them. This can cause issues in hot ambient temperatures or high throughput setups.
If you only have one product going through a flash cooler which has two product coils, it is quite common to ‘double-dip’ the product. This means the beer will travel in through one coil, out of that coil and into the next coil, and then off to the tap which will double the time the beer takes to travel through the cooler.
A remote cooler works on the same principle as a flash cooler but is much larger. You’ll find these in virtually every pub cellar you look in. Designed for high beer throughput with a more oversized ice bath, and changeable product coils for different lengths, the remote is perfect for beers (such as kegged ales) that you don’t want to be served too cold; put in a short 3.8m coil, and your beer will be cool but not too cold.
Generally, we use remote coolers for all our setups as they will cope with most environments.
You’ll also find a water recirculation line on remote coolers (and some of the newer flash coolers) which you’ll learn a bit more about in the next paragraph on pythons!
The Python
So, your beer has been pushed out of the keg by the gas, through the coupler into the beer line, and through the cooler. Next up is the python.
The python takes your nicely chilled beer from the cooler to the tap. It is constructed of anywhere between 2 to 10 different beer product lines. The lines are bundled together along with a water recirculation line and insulated in foam and plastic. In the pic shown, there are six product lines which are colour coded, and flow and return pipes (black) for the water recirculation.
Remember the recirculation line from the previous section? That allows the cooler to circulate ice-cold water through the python, and in some cases up to the tap, to make sure the beer doesn’t warm up once it has left the cooler.

The Tap
The tap is the last thing your beer goes through before hitting your glass. It is a relatively simple on/off switch. Some come with a flow control so you can control how much beer comes out, some don’t. Some are fitted with a fancy nozzle with filters in, and some aren’t.
The end!
That is the basics of how your beer gets from keg to glass. There are LOTS of other components that are sometimes fitted to improve the dispense of the beer, to reduce waste, or even to make the publican’s job simpler, but the basic principle is the same.
